
利用可道云实现OSS内网图形化
背景:因为项目的前端资源在OSS上,需要实现内网测试服务器上使用图形化上传下载文件而不需要分配AccessKey给使用者,最大程度避免各种原因造成AccessKey泄漏。
一、挂载oss至centos主机
1、安装插件,保证Content-Type正确
sudo yum install mailcap
2、下载ossfs的安装包(分centos6.5和centos7.0两者)
centos6.5:https://ctyunwei.oss-cn-hangzhou.aliyuncs.com/download/ossfs_1.80.5_centos6.5_x86_64.rpm
centos7.0:https://ctyunwei.oss-cn-hangzhou.aliyuncs.com/download/ossfs_1.80.4_centos7.0_x86_64.rpm
、执行以下命令安装:
sudo yum localinstall your_ossfs_package
、按次序执行以下命令挂载(注意:不要挂载到/tmp目录):
echo my-bucket:my-access-key-id:my-access-key-secret > /etc/passwd-ossfs
chmod 640 /etc/passwd-ossfs
mkdir -p /oss/ossfs
ossfs my-bucket /oss/ossfs -ourl=http://oss-cn-hangzhou.aliyuncs.com  -o allow_other
#ourl后面要跟正确的地址,根据Bucket不同而不同,如果是阿里云的同区域ESC连OSS建议使用内网地址
二、centos安装nginx和php环境
本文以编译安装举例,如果不擅长可以使用网上的一键脚本进行安装;
三、图形化设置
1、使用以下命令将图形化的zip包拷贝至新目录(如果后期更新,请更换包名):
cd /www
wget http://static.kodcloud.com/update/download/kodexplorer4.40.zip
unzip kodexplorer4.40.zip
mv kodexplorer4.40 kodexplorer
chmod -R 777 kodexplorer
2、进入nginx配置文件夹/usr/local/nginx/conf/vhost,新建域名开头的配置文件,以本文为例,新建了yqsetting.conf这个配置文件,配置如下:
server {
        listen 3505;
        server_name  xxx.xxx.com;
        root  /www/KodExplorer;
        index  index.html index.htm index.php default.php tz.php;
        error_page   500 502 503 504  /50x.html;

        location = /50x.html {
        root html;
        }

        location ~* ^.+\.php(\/.*)*$ {
        fastcgi_pass   127.0.0.1:9000;
        #fastcgi_pass unix:/usr/local/php5-fpm.sock;
        fastcgi_index  index.php;
        fastcgi_param  SCRIPT_FILENAME  $document_root$fastcgi_script_name;
        include        fastcgi_params;
    }
}
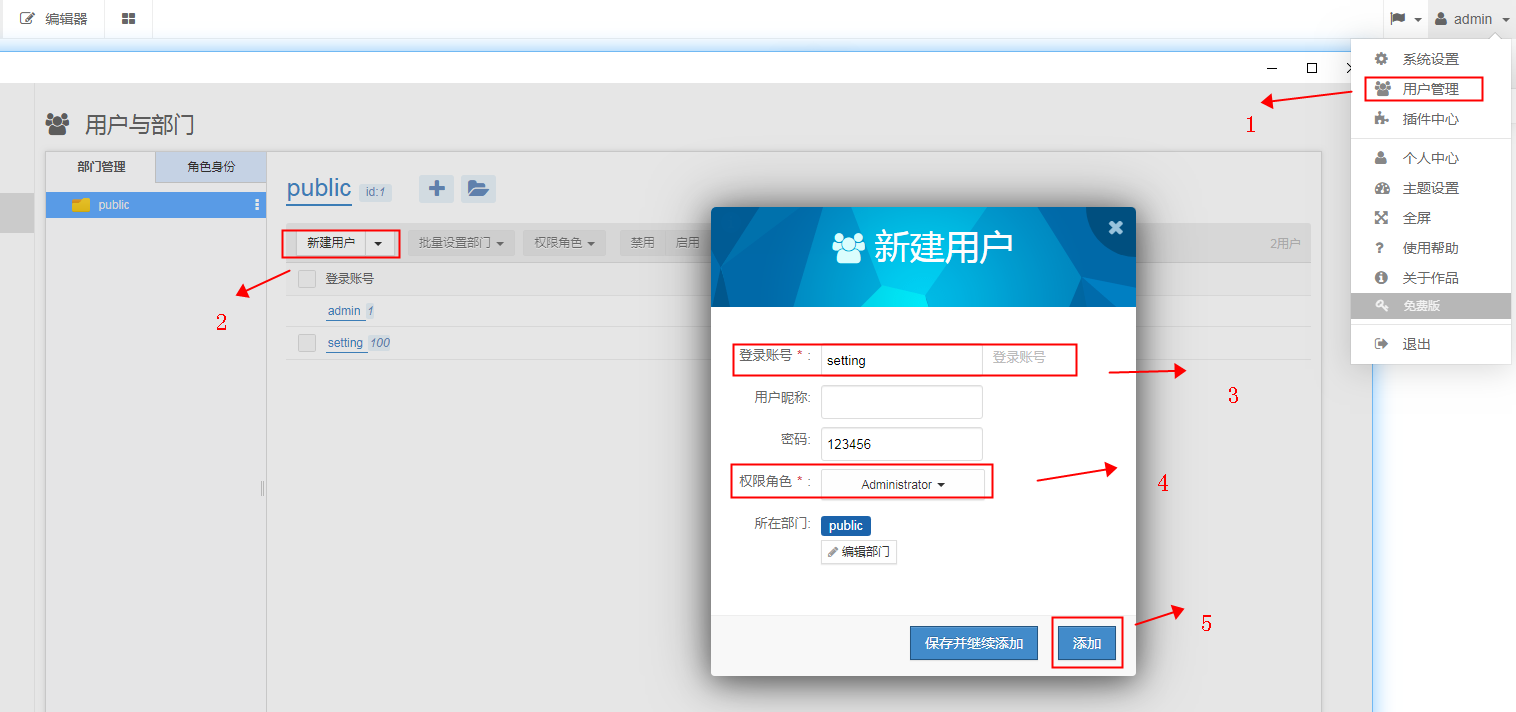
3、按照图形指示设置完admin的密码后登陆,然后依照图示步骤添加用户即可
4、添加完用户后,将我们挂载的OSS目录做软连接到该用户目录下:
ln -s /oss/setting /www/KodExplorer/data/User/setting/home/.
5、完成后可以使用刚才创建的用户直接登陆进行上传下载操作。